Setting up Swingbench for Oracle Autonomous Transaction Processing (ATP)
14/08/18 15:18
The following blog details how to install swingbench against ATP and use it to run load tests. The example below used the Simple Order Entry (SOE) benchmark but its possible to follow the methodology laid out below to run any of the other supplied benchmarks (SH, TPC-DS etc). To do this you’ll need to run through the following steps (Step 8 is optional).
You are likely to already have a ssh key but it is possible that you want to create another purely for this exercise. You’ll need this key to create your application server. You can find details on how to do this here
https://git-scm.com/book/en/v2/Git-on-the-Server-Generating-Your-SSH-Public-Key
It’s the .pub file or more precisely its contents that you’ll need. The public key file is typically created in the hidden .ssh directory in your home directory. The public key will look something like this (modified)
ssh-rsa AAAAB3NzaC1yc2EAAAADAQABAAABAQDfO/80wleUCYxY7Ws8c67PmqL2qRUfpdPGOduHmy9xT9HkCzjoZHHIk1Zx1VpFtQQM+RwJzArZQHXrMnvefleH20AvtbT9bo2cIIZ8446DX0hHPGaGYaJNn6mCeLi/wXW0+mJmKc2xIdasnH8Q686zmv72IZ9UzD12o+nns2FgCwfleQfyVIacjfi+dy4DB8znpb4KU5rKJi5Zl004pd1uSrRtlDKR9OGILvakyf87CnAP/T8ITSMy0HWpqc8dPHJq74S5jeQn/TxrZ6TGVA+xGLzLHN4fLCOGY20gH7w3rqNTqFuUIWuIf4OFdyZoFBQyh1GWMOaKjplUonBmeZlV
You’ll need this in step 3.
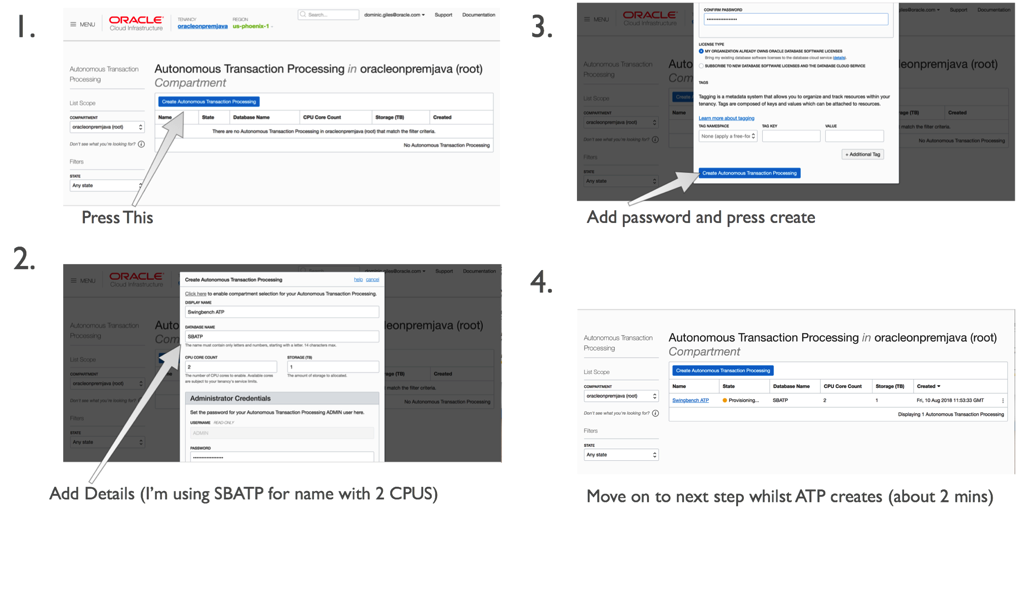
You’ll have to have gone through the process of acquiring an Oracle Cloud account but that’s beyond the scope of this walkthrough. Once you have the account and have logged into Oracle Cloud Infrastructure, click on the menu button in the top left of the screen and select “Autonomous Transaction Processing”. Then simply follow these steps.
Whilst the ATP instance is creating we can create our application to run swingbench. For any reasonable load to be run against the application server you’ll need a minimum of two cores for larger workloads you may need a bigger application or potentially a small cluster of them.
In this walkthrough we’ll create a small 2 core Linux Server VM.
This should only take a couple of minutes. On completion we’ll need to use the public IP address of the application server we created in the previous step.
In this step we’ll use ssh to log onto the application server and setup the environment to run swingbench. Ssh is natively available on MacOS and Linux. On platforms like Windows you can use Putty. You’ll need the IP address of the application server you created in the previous step.
First bring up a terminal on Linux/Mac. On Putty launch a new ssh session. The username will be “opc”
You should see something similar to
By default java isn’t installed on this VM so we’ll need to install it via yum. We’ll need to update yum first
$> sudo yum makecache fast
Then we can install java and its dependencies
$> sudo yum install java-1.8.0-openjdk-headless.x86_64
We should now make sure that java works correctly
$> java -version
openjdk version "1.8.0_181"
OpenJDK Runtime Environment (build 1.8.0_181-b13)
OpenJDK 64-Bit Server VM (build 25.181-b13, mixed mode)
We can now pull the swingbench code from the website
$> curl http://www.dominicgiles.com/swingbench/swingbench261082.zip -o swingbench.zip
and unzip it
$> unzip swingbench.zip
The next step is to get the credentials file for ATP. You can do this by following these steps.
You’ll need to upload this to our application server with a command similar to
$> scp wallet_SBATP.zip opc@129.146.65.101:
This will place our credentials file in the home directory of the application server. You don’t need to unzip it to use it.
We can now install a schema to run our transactions against. We do this by first changing in to the swingbench bin directory
$> cd swingbench/bin
And then running the following command replacing your passwords with those that you specified during the creation of the ATP instance.
A quick explanation of the parameters we are using
You should see the following output. A scale of 1 should take just over 5 mins to create. If you specified more CPUs for the application server of ATP instance you should see some improvements in performance, but this is unlikely to truly linear because of the nature of the code.
You can then validate the schema created correctly using the following command
You may have noticed that the stats failed to collect in the creation of the schema (known problem) so you’ll need to collect stats using the following command
$>./sbutil -soe -cf ~/wallet_SBATP.zip -cs sbatp_medium -u soe -p
And see the row counts for the tables with
The first thing we need to do is to configure the load generator to load the users on in a sensible fashion (i.e. to not exceed the login rate). You could do this manually by editing the config file or use the following command.
We can now run a workload against the newly created schema using a command similar to
I won’t explain the parameters that I detailed earlier when running the wizard but for the new ones do the following
• -v indicates what info should be shown in the terminal when running the command. In this instance I’ve asked that the users logged on, Tx/Min, Tx/Sec and the average response time for each transaction are shown.
• -min and -max indicate the time to sleep between each DML operation in a transaction (intra sleep). A Transaction is made up of many DML operations
• -intermin -intermax indicates the time to sleep between each transaction.
• -di indicates that I want to disable the following transactions SQ,WQ,WA. These are reporting queries and aren’t really needed.
• -rt indicates how long to run the benchmark before stopping it
You should see output similar to the following
We specified a runtime of 30 seconds (-rt 0:0.30) which meant the workload ran for a short period of time. You could increase this by changing the the -rt parameter to something larger like
-rt 1:30
Which would run the benchmark for 1 hour 30mins. or you could leave the -rt command off altogether and the benchmark would run until you hit return.
One thing to try whilst running the load against the server is to try and scale the number of available CPUs to the ATP instance up and down. This should see an increase in the number of transactions being processed.
Somethings to note. At the end of each run you’ll end up with a results file in xml format in the directory you ran charbench from. i.e.
These xml files contain the detailed results of each run i.e. average transactions per second, completed transactions, percentile response times etc. Whilst these are difficult to read you can install swingbench on a windows or mac and use a utility called results2pdf to convert them into a more human parseable form. You can find some details on how to do that here.
http://www.dominicgiles.com/blog/files/86668db677bc5c3fc1f0a0231d595ebc-139.html
Using the methods above you should be able to create scripts that test the performance of the ATP server. i.e. running loads with different CPU counts, users, think times etc.
But beware that before comparing the results with on premise servers there are a lot of features enabled on the ATP server like db_block_checking and db_check_sum that may not be enabled on another Oracle instance.
To make the demo more interactive you could show the charts on the service console. The only issue is that the refresh rate is a little slow. You can improve on this by using some utilities I provide. The first of these is Database Time Monitor (http://www.dominicgiles.com/dbtimeviewer.html).
To install it you first need to download it (http://www.dominicgiles.com/downloads.html) to your PC or mac and make sure that you’ve installed a Java 8 JRE. Once you’ve done that you simply need to unzip it and change into the bin directory. From there all you need to do is to run a command similar to
$> ./dbtimemonitor -u admin -p
or on Windows
$> dbtimemonitor.bat -u admin -p -cs sbatp_low -cf /Users/dgiles/Downloads/wallet_SBATP.zip
The -cf parameter references the credential file you downloaded and the -cs parameter references the service for ATP. You should see a scree similar to this.
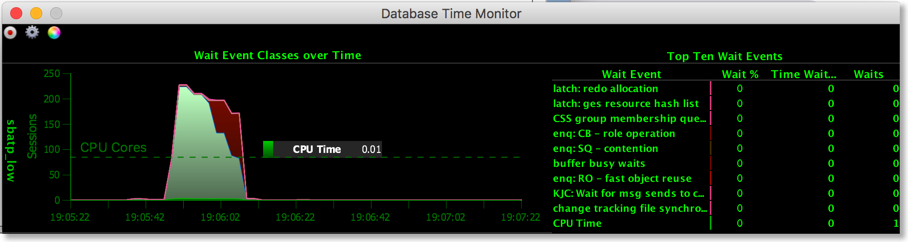
You can use this to monitor in real time the activity of the ATP instance. Currently it reports all of the cores on the server you are running on. This will be fixed shortly to just show the cores available to you.
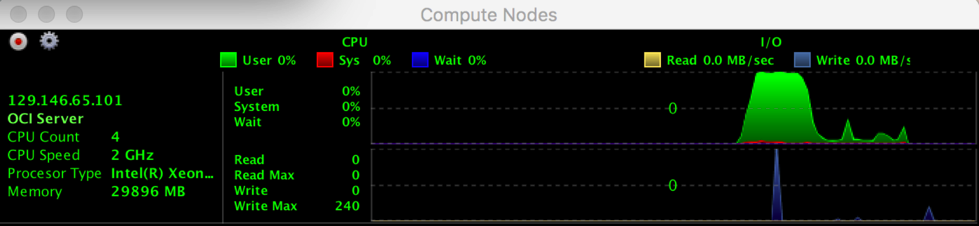
The final tool, cpumonitor (http://www.dominicgiles.com/cpumonitor.html), allows you to monitor the activity of the application server. This can be downloaded from here (http://www.dominicgiles.com/downloads.html) and again should be installed on your PC or Mac. This is done by simply unzipping the download. Then change into the bin directory on mac or linux or the winbin directory on a windows machine.
You’ll need to edit the XML file to reflect the location of the application server.
Save the file and then launch it with the command
$> ./cpumonitor
That's it. We’ve installed swingbench against Oracle Autonomous Transaction Processing. In my next blog entry we'll take a look at some automated tests you can user to kick the tyres on ATP. I'll also include a version that shows how to install the TPC-DS like schema that comes with swingbench against Oracle Autonomous Warehouse.
Step 1/ Make Sure you have a SSH Public key
You are likely to already have a ssh key but it is possible that you want to create another purely for this exercise. You’ll need this key to create your application server. You can find details on how to do this here
https://git-scm.com/book/en/v2/Git-on-the-Server-Generating-Your-SSH-Public-Key
It’s the .pub file or more precisely its contents that you’ll need. The public key file is typically created in the hidden .ssh directory in your home directory. The public key will look something like this (modified)
ssh-rsa AAAAB3NzaC1yc2EAAAADAQABAAABAQDfO/80wleUCYxY7Ws8c67PmqL2qRUfpdPGOduHmy9xT9HkCzjoZHHIk1Zx1VpFtQQM+RwJzArZQHXrMnvefleH20AvtbT9bo2cIIZ8446DX0hHPGaGYaJNn6mCeLi/wXW0+mJmKc2xIdasnH8Q686zmv72IZ9UzD12o+nns2FgCwfleQfyVIacjfi+dy4DB8znpb4KU5rKJi5Zl004pd1uSrRtlDKR9OGILvakyf87CnAP/T8ITSMy0HWpqc8dPHJq74S5jeQn/TxrZ6TGVA+xGLzLHN4fLCOGY20gH7w3rqNTqFuUIWuIf4OFdyZoFBQyh1GWMOaKjplUonBmeZlV
You’ll need this in step 3.
Step 2/ Create the ATP Instance
You’ll have to have gone through the process of acquiring an Oracle Cloud account but that’s beyond the scope of this walkthrough. Once you have the account and have logged into Oracle Cloud Infrastructure, click on the menu button in the top left of the screen and select “Autonomous Transaction Processing”. Then simply follow these steps.
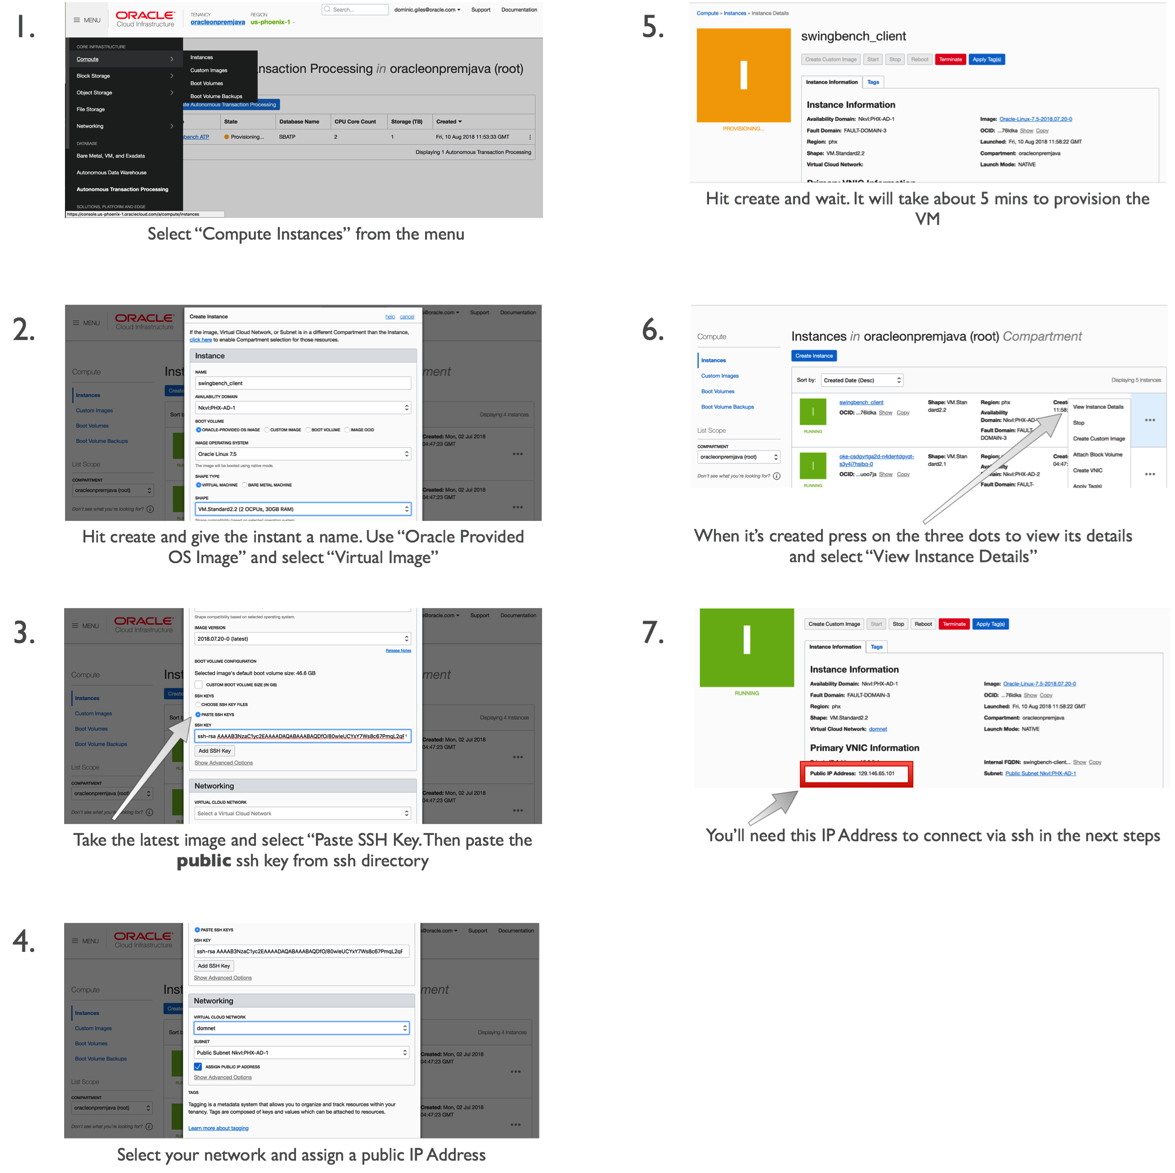
Step 3/ Create a compute resource for the application server
Whilst the ATP instance is creating we can create our application to run swingbench. For any reasonable load to be run against the application server you’ll need a minimum of two cores for larger workloads you may need a bigger application or potentially a small cluster of them.
In this walkthrough we’ll create a small 2 core Linux Server VM.
This should only take a couple of minutes. On completion we’ll need to use the public IP address of the application server we created in the previous step.
Step 4/ Log onto application server and setup the environment
In this step we’ll use ssh to log onto the application server and setup the environment to run swingbench. Ssh is natively available on MacOS and Linux. On platforms like Windows you can use Putty. You’ll need the IP address of the application server you created in the previous step.
First bring up a terminal on Linux/Mac. On Putty launch a new ssh session. The username will be “opc”
ssh opc@< IP Address of Appserver >
You should see something similar to
$> ssh opc@129.146.65.101
ECDSA key fingerprint is SHA256:kNbpKWL3M1wB6PUFy2GOl+JmaTIxLQiggMzn6vl2qK1tM.
Are you sure you want to continue connecting (yes/no)? yes
Warning: Permanently added '129.146.65.101' (ECDSA) to the list of known hosts.
Enter passphrase for key '/Users/dgiles/.ssh/id_rsa':
[opc@swingbench-client ~]$
By default java isn’t installed on this VM so we’ll need to install it via yum. We’ll need to update yum first
$> sudo yum makecache fast
Then we can install java and its dependencies
$> sudo yum install java-1.8.0-openjdk-headless.x86_64
We should now make sure that java works correctly
$> java -version
openjdk version "1.8.0_181"
OpenJDK Runtime Environment (build 1.8.0_181-b13)
OpenJDK 64-Bit Server VM (build 25.181-b13, mixed mode)
We can now pull the swingbench code from the website
$> curl http://www.dominicgiles.com/swingbench/swingbench261082.zip -o swingbench.zip
and unzip it
$> unzip swingbench.zip
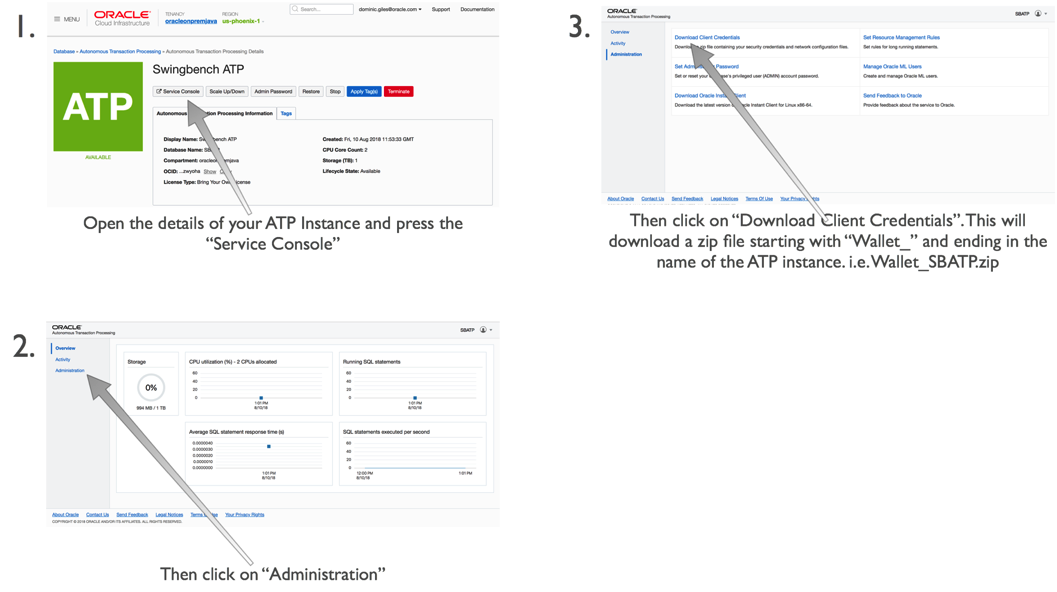
Step 5/ Download the credentials file
The next step is to get the credentials file for ATP. You can do this by following these steps.
You’ll need to upload this to our application server with a command similar to
$> scp wallet_SBATP.zip opc@129.146.65.101:
This will place our credentials file in the home directory of the application server. You don’t need to unzip it to use it.
Step 6/ Install a workload schema into the ATP instance
We can now install a schema to run our transactions against. We do this by first changing in to the swingbench bin directory
$> cd swingbench/bin
And then running the following command replacing your passwords with those that you specified during the creation of the ATP instance.
A quick explanation of the parameters we are using
- -cf tells oewizard the location of the credentials file
- -cs is the connecting for the service of the ATP instance. It is based on the name of the instance and is of the form
followed by one of the following _low, _medium,_high,_parallel - -ts is the name of the table space to install swingbench into. It is currently always “data”
- -dba is the admin user, currently this is always admin
- -dbap is the password you specified at the creation of the ATP instance
- -u is the name you want to give to the user you are installing swingbench into (I’d recommend soe)
- -p is the password for the user. It needs to follow the password complexity rules of ATP
- -async_off you need to disable the wizards default behavior of using async commits. This is currently prohibited on ATP
- -scale indicates the size of the schema you want to create where a scale of 1 will generate 1GB of data. The indexes will take an additional amount of space roughly half the size of the data. A scale of 10 will generate a 10GB of data and roughly of 5GB of indexes
- -hashpart tells the wizard to use hash partitioning
- -create tells swingbench to create the schema (-drop will delete the schema)
- -cl tells swingbech to run in character mode
- -v tells swingbench to output whats going on (verbose mode)
You should see the following output. A scale of 1 should take just over 5 mins to create. If you specified more CPUs for the application server of ATP instance you should see some improvements in performance, but this is unlikely to truly linear because of the nature of the code.
SwingBench Wizard
Author  :	 Dominic Giles
Version :	 2.6.0.1082

Running in Lights Out Mode using config file : ../wizardconfigs/oewizard.xml
Connecting to : jdbc : oracle : thin : @sbatp_medium
Connected
Starting run
Starting script ../sql/soedgdrop2.sql
Script completed in 0 hour(s) 0 minute(s) 2 second(s) 691 millisecond(s)
Starting script ../sql/soedgcreatetableshash2.sql
Script completed in 0 hour(s) 0 minute(s) 1 second(s) 433 millisecond(s)
Starting script ../sql/soedgviews.sql
Script completed in 0 hour(s) 0 minute(s) 0 second(s) 31 millisecond(s)
Starting script ../sql/soedgsqlset.sql
Script completed in 0 hour(s) 0 minute(s) 0 second(s) 196 millisecond(s)
Inserting data into table ADDRESSES_1124999
Inserting data into table ADDRESSES_2
Inserting data into table ADDRESSES_375001
Inserting data into table ADDRESSES_750000
Inserting data into table CUSTOMERS_749999
Inserting data into table CUSTOMERS_250001
Inserting data into table CUSTOMERS_500000
Inserting data into table CUSTOMERS_2
Run time 0:00:19 : Running threads (8/8) : Percentage completed : 5.36
You can then validate the schema created correctly using the following command
$> ./sbutil -soe -cf ~/wallet_SBATP.zip -cs sbatp_medium -u soe -p < a password for the soe user > -val
The Order Entry Schema appears to be valid.
--------------------------------------------------
|Object Type    |     Valid|   Invalid|   Missing|
--------------------------------------------------
|Table          |        10|         0|         0|
|Index          |        26|         0|         0|
|Sequence       |         5|         0|         0|
|View           |         2|         0|         0|
|Code           |         1|         0|         0|
--------------------------------------------------
You may have noticed that the stats failed to collect in the creation of the schema (known problem) so you’ll need to collect stats using the following command
$>./sbutil -soe -cf ~/wallet_SBATP.zip -cs sbatp_medium -u soe -p
And see the row counts for the tables with
$ ./sbutil -soe -cf ~/wallet_SBATP.zip -cs sbatp_medium -u soe -p < your soe password > -tables
Order Entry Schemas Tables
----------------------------------------------------------------------------------------------------------------------
|Table Name                  |                Rows|              Blocks|           Size|   Compressed?|  Partitioned?|
----------------------------------------------------------------------------------------------------------------------
|ORDER_ITEMS                 |           4,271,594|              64,448|        512.0MB|              |           Yes|
|ADDRESSES                   |           1,500,000|              32,192|        256.0MB|              |           Yes|
|LOGON                       |           2,382,984|              32,192|        256.0MB|              |           Yes|
|CARD_DETAILS                |           1,500,000|              32,192|        256.0MB|              |           Yes|
|ORDERS                      |           1,429,790|              32,192|        256.0MB|              |           Yes|
|CUSTOMERS                   |           1,000,000|              32,192|        256.0MB|              |           Yes|
|INVENTORIES                 |             897,672|               2,386|         19.0MB|      Disabled|            No|
|PRODUCT_DESCRIPTIONS        |               1,000|                  35|          320KB|      Disabled|            No|
|PRODUCT_INFORMATION         |               1,000|                  28|          256KB|      Disabled|            No|
|ORDERENTRY_METADATA         |                   4|                   5|           64KB|      Disabled|            No|
|WAREHOUSES                  |               1,000|                   5|           64KB|      Disabled|            No|
----------------------------------------------------------------------------------------------------------------------
                                                            Total Space           1.8GB
Step 7/ Run a workload
The first thing we need to do is to configure the load generator to load the users on in a sensible fashion (i.e. to not exceed the login rate). You could do this manually by editing the config file or use the following command.
We can now run a workload against the newly created schema using a command similar to
I won’t explain the parameters that I detailed earlier when running the wizard but for the new ones do the following
• -v indicates what info should be shown in the terminal when running the command. In this instance I’ve asked that the users logged on, Tx/Min, Tx/Sec and the average response time for each transaction are shown.
• -min and -max indicate the time to sleep between each DML operation in a transaction (intra sleep). A Transaction is made up of many DML operations
• -intermin -intermax indicates the time to sleep between each transaction.
• -di indicates that I want to disable the following transactions SQ,WQ,WA. These are reporting queries and aren’t really needed.
• -rt indicates how long to run the benchmark before stopping it
You should see output similar to the following
$> ./charbench -c ../configs/SOE_Server_Side_V2.xml -cf ~/wallet_SBATP.zip -cs sbatp_low -u soe -p < your soe password > -v users,tpm,tps,vresp -intermin 0 -intermax 0 -min 0 -max 0 -uc 128 -di SQ,WQ,WA -rt 0:0.30
Author  :	 Dominic Giles
Version :	 2.6.0.1082

Results will be written to results.xml.
Hit Return to Terminate Run...

Time		Users	TPM	TPS	NCR	UCD	BP	OP	PO	BO	SQ	WQ	WA
17:29:53	[0/128]	0	0	0	0	0	0	0	0	0	0	0
17:29:54	[0/128]	0	0	0	0	0	0	0	0	0	0	0
17:29:55	[0/128]	0	0	0	0	0	0	0	0	0	0	0
17:29:56	[40/128]	0	0	0	0	0	0	0	0	0	0	0
17:29:57	[45/128]	0	0	0	0	0	0	0	0	0	0	0
17:29:58	[51/128]	0	0	0	0	0	0	0	0	0	0	0
17:29:59	[60/128]	0	0	0	0	0	0	0	0	0	0	0
17:30:00	[69/128]	0	0	0	0	0	0	0	0	0	0	0
17:30:01	[78/128]	0	0	0	0	0	0	0	0	0	0	0
17:30:02	[84/128]	0	0	0	0	0	0	0	0	0	0	0
17:30:03	[95/128]	0	0	0	0	0	0	0	0	0	0	0
17:30:04	[101/128]	0	0	0	0	0	0	0	0	0	0	0
17:30:05	[104/128]	0	0	419	395	547	554	0	570	0	0	0
17:30:06	[108/128]	118	118	653	110	379	1576	375	647	0	0	0
17:30:07	[116/128]	325	207	355	220	409	406	499	450	0	0	0
17:30:08	[128/128]	547	222	423	100	203	504	403	203	0	0	0
17:30:09	[128/128]	831	284	420	306	303	396	501	505	0	0	0
17:30:10	[128/128]	1133	302	344	234	232	884	603	217	0	0	0
17:30:11	[128/128]	1438	305	564	367	355	375	559	376	0	0	0
17:30:12	[128/128]	1743	305	443	150	323	319	233	143	0	0	0
17:30:13	[128/128]	2072	329	1712	179	108	183	325	179	0	0	0
17:30:14	[128/128]	2444	372	1036	102	147	204	194	134	0	0	0
17:30:15	[128/128]	2807	363	1584	85	182	234	179	169	0	0	0
17:30:16	[128/128]	3241	434	741	159	157	250	256	251	0	0	0
17:30:17	[128/128]	3653	412	517	91	178	181	176	137	0	0	0
We specified a runtime of 30 seconds (-rt 0:0.30) which meant the workload ran for a short period of time. You could increase this by changing the the -rt parameter to something larger like
-rt 1:30
Which would run the benchmark for 1 hour 30mins. or you could leave the -rt command off altogether and the benchmark would run until you hit return.
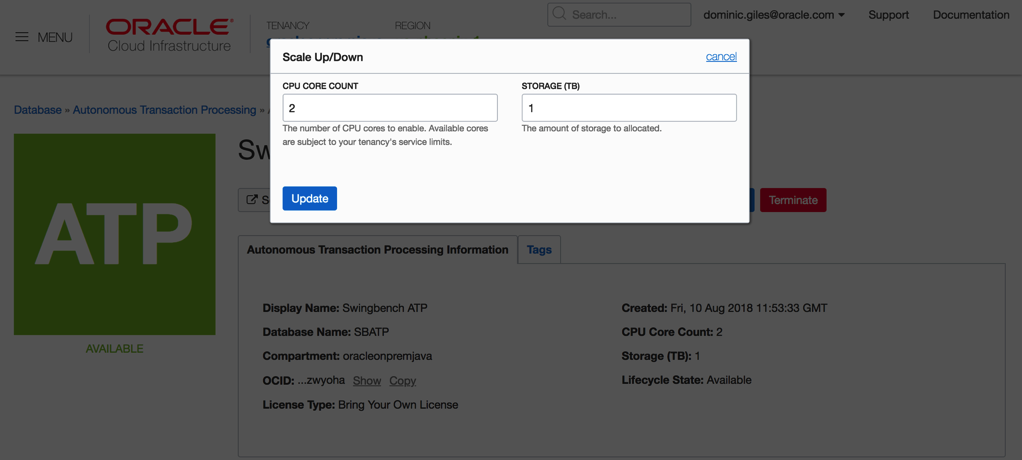
One thing to try whilst running the load against the server is to try and scale the number of available CPUs to the ATP instance up and down. This should see an increase in the number of transactions being processed.
Somethings to note. At the end of each run you’ll end up with a results file in xml format in the directory you ran charbench from. i.e.
$ ls
bmcompare  clusteroverview  debug.log   oewizard          results00003.xml  results00006.xml  results00009.xml  sbutil      swingbench
ccwizard   coordinator      jsonwizard  results00001.xml  results00004.xml  results00007.xml  results2pdf       shwizard    tpcdswizard
charbench  data             minibench   results00002.xml  results00005.xml  results00008.xml  results.xml       sqlbuilder
These xml files contain the detailed results of each run i.e. average transactions per second, completed transactions, percentile response times etc. Whilst these are difficult to read you can install swingbench on a windows or mac and use a utility called results2pdf to convert them into a more human parseable form. You can find some details on how to do that here.
http://www.dominicgiles.com/blog/files/86668db677bc5c3fc1f0a0231d595ebc-139.html
Using the methods above you should be able to create scripts that test the performance of the ATP server. i.e. running loads with different CPU counts, users, think times etc.
But beware that before comparing the results with on premise servers there are a lot of features enabled on the ATP server like db_block_checking and db_check_sum that may not be enabled on another Oracle instance.
Step 8/ Optional functionality
To make the demo more interactive you could show the charts on the service console. The only issue is that the refresh rate is a little slow. You can improve on this by using some utilities I provide. The first of these is Database Time Monitor (http://www.dominicgiles.com/dbtimeviewer.html).
To install it you first need to download it (http://www.dominicgiles.com/downloads.html) to your PC or mac and make sure that you’ve installed a Java 8 JRE. Once you’ve done that you simply need to unzip it and change into the bin directory. From there all you need to do is to run a command similar to
$> ./dbtimemonitor -u admin -p
or on Windows
$> dbtimemonitor.bat -u admin -p
The -cf parameter references the credential file you downloaded and the -cs parameter references the service for ATP. You should see a scree similar to this.
You can use this to monitor in real time the activity of the ATP instance. Currently it reports all of the cores on the server you are running on. This will be fixed shortly to just show the cores available to you.
The final tool, cpumonitor (http://www.dominicgiles.com/cpumonitor.html), allows you to monitor the activity of the application server. This can be downloaded from here (http://www.dominicgiles.com/downloads.html) and again should be installed on your PC or Mac. This is done by simply unzipping the download. Then change into the bin directory on mac or linux or the winbin directory on a windows machine.
You’ll need to edit the XML file to reflect the location of the application server.
Save the file and then launch it with the command
$> ./cpumonitor
Conclusion
That's it. We’ve installed swingbench against Oracle Autonomous Transaction Processing. In my next blog entry we'll take a look at some automated tests you can user to kick the tyres on ATP. I'll also include a version that shows how to install the TPC-DS like schema that comes with swingbench against Oracle Autonomous Warehouse.
blog comments powered by Disqus