Jupyter, Python, Oracle and Docker Part 3
Create Oracle Database in a Docker Container
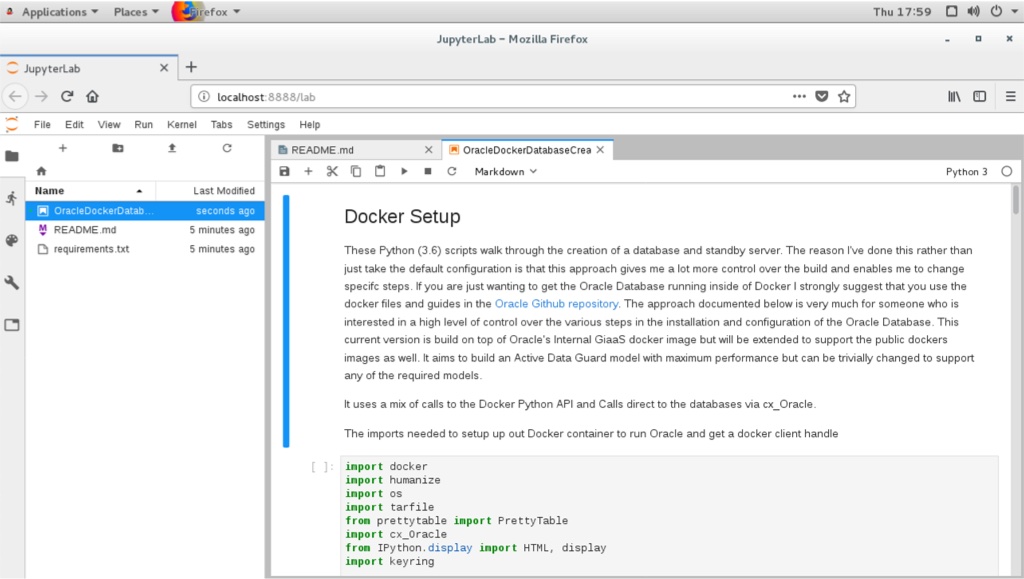
These Python (3.6) scripts walk through the creation of a database and standby server. The reason I've done this rather than just take the default configuration is that this approach gives me a lot more control over the build and enables me to change specifc steps. If you are just wanting to get the Oracle Database running inside of Docker I strongly suggest that you use the docker files and guides in the Oracle Github repository. The approach documented below is very much for someone who is interested in a high level of control over the various steps in the installation and configuration of the Oracle Database. This current version is build on top of Oracle's Internal GiaaS docker image but will be extended to support the public dockers images as well. It aims to build an Active Data Guard model with maximum performance but can be trivially changed to support any of the required models.
It uses a mix of calls to the Docker Python API and Calls direct to the databases via cx_Oracle.
The following code section imports the needed modules to setup up our Docker container to create the Oracle Database. After that we get a Docker client handle which enables use to call the API against our local Docker environment.
import docker
import humanize
import os
import tarfile
from prettytable import PrettyTable
import cx_Oracle
from IPython.display import HTML, display
import keyring
from ipynb.fs.full.OracleDockerDatabaseFunctions import list_images,list_containers,copy_to,create_and_run_script,containter_exec,containter_root_exec,copy_string_to_file

client = docker.from_env(timeout=600)
list_images(client)
Configuration Parameters
The following section contains the parameters for setting the configuration of the install. The following parameters image_name,host_oradata,sb_host_oradata need to be changed, although sb_host_oradata is only important if you are planning on installing a standby database.
# The following parameters are specific to your install and almost certainly need to be changed
image_name = 'cc75a47617' # Taken from the id value above
host_oradata = '/Users/dgiles/Downloads/dockerdbs/oradataprimary' # The directory on the host where primary database will be persisted
sb_host_oradata = '/Users/dgiles/Downloads/dockerdbs/oradatastby' # The direcotry on the host where the standby database will be persisted
#
# The rest are fairly generic and can be changed if needed
oracle_version = '18.0.0'
db_name = 'ORCL'
stby_name = 'ORCL_STBY'
sys_password =  keyring.get_password('docker','sys') # I'm just using keyring to hide my password but you can set it to a simple sting i.e. 'mypassword'
pdb_name = 'soe'
p_host_name = 'oracleprimary'
sb_host_name = 'oraclestby'
total_memory = 2048

container_oradata = '/u01/app/oracle/oradata'
o_base = '/u01/app/oracle'
r_area = f'{o_base}/oradata/recovery_area'
o_area = f'{o_base}/oradata/'
a_area = f'{o_base}/admin/ORCL/adump'
o_home = f'{o_base}/product/{oracle_version}/dbhome_1'
t_admin = f'{o_base}/oradata/dbconfig'
log_size = 200
Create Primary Database
This code does the heavy lifting. It creates a container oracleprimary (unless you changed the paramter) running the Oracle Database. The containers 1521 port is mapped onto the the hosts 1521 port. This means that to connect from the host, via a tool like sqlplus, all you'd need to do is sqlplus soe/soe@//locahost/soe.
path = f'{o_home}/bin:/usr/local/sbin:/usr/local/bin:/usr/sbin:/usr/bin:/sbin:/bin'

p_container = client.containers.create(image_name,
                                       command="/bin/bash",
                                       hostname=p_host_name,
                                       tty=True,
                                       stdin_open=True,
                                       auto_remove=False,
                                       name=p_host_name,
                                       shm_size='3G',
                                       # network_mode='host',
                                       ports={1521:1521,5500:5500},
                                       volumes={host_oradata: {'bind': container_oradata, 'mode': 'rw'}},
                                       environment={'PATH':path,'ORACLE_SID': db_name, 'ORACLE_BASE': o_base,'TNS_ADMIN': t_admin}
                                       )

p_container.start()
# Make all of the containers attributes available via Python Docker API
p_container.reload()
The next step uses DBCA and configures features like Automatic Memory Mangement, Oracle Managed Files and sets the size of the SGA and redo logs. It prints out the status of the creation during it's progression. NOTE : This step typically takes 10 to 12 minutes.
statement = f'''dbca -silent \
 -createDatabase \
 -templateName General_Purpose.dbc \
 -gdbname {db_name} -sid {db_name} -responseFile NO_VALUE \
 -characterSet AL32UTF8 \
 -sysPassword {sys_password} \
 -systemPassword {sys_password} \
 -createAsContainerDatabase true \
 -numberOfPDBs 1 \
 -pdbName {pdb_name} \
 -pdbAdminPassword {sys_password} \
 -databaseType MULTIPURPOSE \
 -totalMemory {total_memory} \
 -memoryMgmtType AUTO_SGA \
 -recoveryAreaDestination "{r_area}" \
 -storageType FS \
 -useOMF true \
 -datafileDestination "{o_area}" \
 -redoLogFileSize {log_size} \
 -emConfiguration NONE \
 -ignorePreReqs\
 '''

containter_exec(p_container, statement)
Create Primary Database's Listener
This step creates the database listener for the primary database. The tnsnames.ora will be over written in a later step if you choose to have a stand by configuration. NOTE : I could create a DNSMasq container or something similar and add container networking details to make the whole inter node communication simpler but it's a bit of an overkill and so we'll use IP addresses which are easily found.
p_ip_adress = p_container.attrs['NetworkSettings']['IPAddress']

p_listener = f'''LISTENER=
    (DESCRIPTION=
        (ADDRESS = (PROTOCOL=tcp)(HOST={p_ip_adress})(PORT=1521))
        (ADDRESS = (PROTOCOL = IPC)(KEY = EXTPROC1521))
    )

SID_LIST_LISTENER=
    (SID_LIST=
        (SID_DESC=
            (GLOBAL_DBNAME={db_name}_DGMGRL)
            (ORACLE_HOME={o_home})
            (SID_NAME={db_name})
            (ENVS="TNS_ADMIN={t_admin}"
        )
    )
'''
copy_string_to_file(p_listener, f'{t_admin}/listener.ora', p_container)

contents = '''NAMES.DIRECTORY_PATH= (TNSNAMES, EZCONNECT)'''

copy_string_to_file(contents, f'{t_admin}/sqlnet.ora', p_container)

contents = f'''
ORCL =
  (DESCRIPTION =
    (ADDRESS = (PROTOCOL = TCP)(HOST = {p_ip_adress})(PORT=1521))
    (CONNECT_DATA =
      (SERVER = DEDICATED)
      (SID = {db_name})
    )
  )
'''
copy_string_to_file(contents, f'{t_admin}/tnsnames.ora', p_container)
)
)
'''
copy_string_to_file(p_listener, f'{t_admin}/listener.ora', p_container)
contents = '''NAMES.DIRECTORY_PATH= (TNSNAMES, EZCONNECT)'''
copy_string_to_file(contents, f'{t_admin}/sqlnet.ora', p_container)
contents = f'''
ORCL =
(DESCRIPTION =
(ADDRESS = (PROTOCOL = TCP)(HOST = {p_ip_adress})(PORT=1521))
(CONNECT_DATA =
(SERVER = DEDICATED)
(SID = {db_name})
)
)
'''
copy_string_to_file(contents, f'{t_admin}/tnsnames.ora', p_container)
And start the listener
containter_exec(p_container, 'lsnrctl start')
At this stage you should have a fully functioning Oracle Database. In theory there's no need to go any further if thats all you want.
Create Stand By Container
This step creates another container to run the standby databases. It should be pretty much instant. NOTE : You'll only need to run the rest of the code from here if you need a standby database.
sb_container = client.containers.create(image_name,
                                       hostname=sb_host_name,
                                       command="/bin/bash",
                                       tty=True,
                                       stdin_open=True,
                                       auto_remove=False,
                                       name=sb_host_name,
                                       shm_size='3G',
                                       ports={1521:1522,5500:5501},
                                       volumes={sb_host_oradata: {'bind': container_oradata, 'mode': 'rw'}},
                                       environment={'PATH':path,'ORACLE_SID':db_name,'ORACLE_BASE':o_base,'TNS_ADMIN':t_admin}
                                       )
sb_container.start()
# Make all of the containers attributes available via Python Docker API
sb_container.reload()
Display the running containers.
list_containers(client)
Configure the Standby Database
Create some additional directories on the standby so they are consistent with the primary.
containter_exec(sb_container, f'mkdir -p {o_area}/{db_name}')
containter_exec(sb_container, f'mkdir -p {t_admin}')
containter_exec(sb_container, f'mkdir -p {r_area}/{db_name}')
containter_exec(sb_container, f'mkdir -p {a_area}')
Create Standby Database's Listener
Create the standby listenrs network configuration and then start the listener. NOTE : We'll be overwriting the primary databases tnsnames.ora file in this step.
sb_ip_adress = sb_container.attrs['NetworkSettings']['IPAddress']

contents = f'''
ORCL =
  (DESCRIPTION =
    (ADDRESS = (PROTOCOL = TCP)(HOST = {p_ip_adress})(PORT=1521))
    (CONNECT_DATA =
      (SERVER = DEDICATED)
      (SID = {db_name})
    )
  )

ORCL_STBY =
  (DESCRIPTION =
    (ADDRESS = (PROTOCOL = TCP)(HOST = {sb_ip_adress})(PORT=1521))
    (CONNECT_DATA =
      (SERVER = DEDICATED)
      (SID = {db_name})
    )
  )
'''

copy_string_to_file(contents, f'{t_admin}/tnsnames.ora', p_container)
copy_string_to_file(contents, f'{t_admin}/tnsnames.ora', sb_container)

sb_listener = f'''LISTENER=
    (DESCRIPTION=
        (ADDRESS = (PROTOCOL=tcp)(HOST={sb_ip_adress})(PORT =1521))
        (ADDRESS = (PROTOCOL = IPC)(KEY = EXTPROC1521))
    )

SID_LIST_LISTENER=
    (SID_LIST=
        (SID_DESC=
            (GLOBAL_DBNAME={stby_name}_DGMGRL)
            (ORACLE_HOME={o_home})
            (SID_NAME={db_name})
            (ENVS="TNS_ADMIN={t_admin}"
        )
    )
'''
copy_string_to_file(sb_listener, f'{t_admin}/listener.ora', sb_container)

contents = '''NAMES.DIRECTORY_PATH= (TNSNAMES, EZCONNECT)'''

copy_string_to_file(contents, f'{t_admin}/sqlnet.ora', sb_container)
And start the listener
containter_exec(sb_container, 'lsnrctl start')
Configure the servers for Data Guard
It might be necessary to pause for a few seconds before moving onto the next step to allow the database to register with the listener...
The next step is to connect to primary and standby servers and set various parameters and configuration to enable us to run Data Guard.
First check the status of archive logging on the primary.
connection = cx_Oracle.connect("sys",sys_password,f"//localhost:1521/{db_name}", mode=cx_Oracle.SYSDBA)
cursor = connection.cursor();
rs = cursor.execute("SELECT log_mode FROM v$database")
for row in rs:
    print(f"Database is in {row[0]} mode")
By default it will be in no archivelog mode so we need to shut it down and enable archive log mode
contents = '''sqlplus / as sysdba << EOF
SET ECHO ON;
SHUTDOWN IMMEDIATE;
STARTUP MOUNT;
ALTER DATABASE ARCHIVELOG;
ALTER DATABASE OPEN;
EOF
'''

create_and_run_script(contents, '/tmp/set_archivelog.sql',  '/bin/bash /tmp/set_archivelog.sql', p_container)
And check again
connection = cx_Oracle.connect("sys",sys_password,f"//localhost:1521/{db_name}", mode=cx_Oracle.SYSDBA)
cursor = connection.cursor();
rs = cursor.execute("SELECT log_mode FROM v$database")
for row in rs:
    print(f"Database is in {row[0]} mode")
And then force a log switch
cursor.execute("ALTER DATABASE FORCE LOGGING")
cursor.execute("ALTER SYSTEM SWITCH LOGFILE")
Add some Standby Logging Files
cursor.execute("ALTER DATABASE ADD STANDBY LOGFILE SIZE 200M")
cursor.execute("ALTER DATABASE ADD STANDBY LOGFILE SIZE 200M")
cursor.execute("ALTER DATABASE ADD STANDBY LOGFILE SIZE 200M")
cursor.execute("ALTER DATABASE ADD STANDBY LOGFILE SIZE 200M")
Enable Flashback and standby file management
cursor.execute("ALTER DATABASE FLASHBACK ON")
cursor.execute("ALTER SYSTEM SET STANDBY_FILE_MANAGEMENT=AUTO")
Start an instance
Create a temporary init.ora file to enable us to start an instance on the standby
contents = f"DB_NAME='{db_name}'\n"
copy_string_to_file(contents, f'/tmp/init{db_name}.ora', sb_container)
Create a password file on the standby with the same parameters as the primary
containter_exec(sb_container, f'orapwd file=$ORACLE_HOME/dbs/orapw{db_name} password={sys_password} entries=10 format=12')
And start up the standby instance
contents = f'''STARTUP NOMOUNT PFILE='/tmp/init{db_name}.ora';
EXIT;
'''
create_and_run_script(contents, '/tmp/start_db.sql', 'sqlplus / as sysdba @/tmp/start_db.sql', sb_container)
Duplicate the Primary database to the Standby database
Duplicate the primary to the standby. For some reason the tnsnames isn't picked up on the primary/standby in the same location so an explicit connection string is needed.
contents = f'''rman TARGET sys/{sys_password}@{db_name} AUXILIARY sys/{sys_password}@{stby_name} << EOF
DUPLICATE TARGET DATABASE
  FOR STANDBY
  FROM ACTIVE DATABASE
  DORECOVER
  SPFILE
    SET db_unique_name='{stby_name}' COMMENT 'Is standby'
  NOFILENAMECHECK;
EOF
'''

create_and_run_script(contents, '/tmp/duplicate.sh', "/bin/bash /tmp/duplicate.sh", sb_container)
Start the Data Guard Broker
It's best practice to use Data Guard Broker and so we'll need to start it on both instances and then create a configuration.
cursor.execute("ALTER SYSTEM SET dg_broker_start=true")

sb_connection = cx_Oracle.connect("sys",sys_password,f"//localhost:1522/{stby_name}", mode=cx_Oracle.SYSDBA)
sb_cursor = sb_connection.cursor()
sb_cursor.execute("ALTER SYSTEM SET dg_broker_start=true")
Create a configuration
contents = f'''export TNS_ADMIN={t_admin};
dgmgrl sys/{sys_password}@{db_name} << EOF
SET ECHO ON;
CREATE CONFIGURATION orcl_stby_config AS PRIMARY DATABASE IS {db_name} CONNECT IDENTIFIER IS {db_name};
EXIT;
EOF
'''

create_and_run_script(contents, '/tmp/dgconfig.sh', "/bin/bash /tmp/dgconfig.sh", p_container)
Add the standby
contents = f'''export TNS_ADMIN={t_admin};
dgmgrl sys/{sys_password}@{db_name} << EOF
SET ECHO ON;
ADD DATABASE {stby_name} AS CONNECT IDENTIFIER IS {stby_name} MAINTAINED AS PHYSICAL;
EXIT;
EOF
'''

create_and_run_script(contents, '/tmp/dgconfig2.sh', "/bin/bash /tmp/dgconfig2.sh", p_container)
Enable the configuration
contents = f'''export TNS_ADMIN={t_admin};
dgmgrl sys/{sys_password}@{db_name} << EOF
SET ECHO ON;
ENABLE CONFIGURATION;
EXIT;
EOF
'''

create_and_run_script(contents, '/tmp/dgconfig3.sh', "/bin/bash /tmp/dgconfig3.sh", p_container)
Display the configuration
contents = f'''export TNS_ADMIN={t_admin};
dgmgrl sys/{sys_password}@{db_name} << EOF
SET ECHO ON;
SHOW CONFIGURATION;
SHOW DATABASE {db_name};
SHOW DATABASE {stby_name};
EOF
'''

create_and_run_script(contents, '/tmp/dgconfig4.sh', "/bin/bash /tmp/dgconfig4.sh", p_container)
/bin/bash /tmp/dgconfig4.sh
DGMGRL for Linux: Release 18.0.0.0.0 - Production on Mon Mar 25 17:14:40 2019
Version 18.3.0.0.0

Copyright (c) 1982, 2018, Oracle and/or its affiliates.  All rights reserved.

Welcome to DGMGRL, type "help" for information.
Connected to "ORCL"
Connected as SYSDBA.
DGMGRL>
DGMGRL>
SHOW CONFIGURATION;

Configuration - orcl_stby_config
Protection Mode: MaxPerformance
Members:
orcl      - Primary database
  orcl_stby - Physical standby database
Warning: ORA-16854: apply lag could not be determined

Fast-Start Failover: DISABLED
Configuration Status:
WARNING (status updated 7 seconds ago)
DGMGRL>
SHOW DATABASE ORCL;
Database - orcl
Role:             PRIMARY
Intended State:   TRANSPORT-ON
Instance(s):
  ORCL
Database Status:
SUCCESS
DGMGRL>
SHOW DATABASE ORCL_STBY;
Database - orcl_stby
Role:             PHYSICAL STANDBY
Intended State:   APPLY-ON
Transport Lag:    0 seconds (computed 2 seconds ago)
Apply Lag:        (unknown)
Average Apply Rateunknown)
Real Time Query:  OFF
Instance(s):
  ORCL


Database Warning(s):
ORA-16854: apply lag could not be determined

Database Status:
WARNING

DGMGRL>
DGMGRL>
Start the Standby in managed recovery
We now need to start the standby so it begins applying redo to keep it consistent with the primary.
contents='''sqlplus / as sysdba << EOF
SET ECHO ON;
SHUTDOWN IMMEDIATE;
STARTUP MOUNT;
ALTER DATABASE RECOVER MANAGED STANDBY DATABASE DISCONNECT FROM SESSION;
EOF
'''

create_and_run_script(contents, '/tmp/convert_to_active.sh', "/bin/bash /tmp/convert_to_active.sh", sb_container)
Standby Database Creation Complete
We now have a primary and standby database that we can begin testing with.
Additional Steps
At this point you should have a physical standby database that is running in maximum performance mode. This might be enough for the testing you want to carry out but there's a number of possible changes that you might want to consider.
- Change the physical standby database to an Active Standby
- Convert the current mode (Maximum Performance) to Maximum Protection or Maximum Availability
- Configure the Oracle Database 19c Active Data Guard feature, DML Redirect
I'll cover these in the following sections but they "icing on the cake" rather than required.
Active Data Guard
This is a relatively trivial change. We just need to alter the standby database to open readonly and then start managed recovery as before
contents='''sqlplus / as sysdba << EOF
SET ECHO ON;
SHUTDOWN IMMEDIATE;
STARTUP MOUNT;
ALTER DATABASE OPEN READ ONLY;
ALTER DATABASE RECOVER MANAGED STANDBY DATABASE DISCONNECT FROM SESSION;
EOF
'''

create_and_run_script(contents, '/tmp/convert_to_active.sh', "/bin/bash /tmp/convert_to_active.sh", sb_container)
Maximum Performance to Maximum Availability
For this change we'll use the Database Guard Broker command line tool to make the change
contents = f'''
dgmgrl sys/{sys_password}@{db_name} << EOF
SET ECHO ON;
SHOW CONFIGURATION;
edit database {stby_name} set property logxptmode=SYNC;
edit configuration set protection mode as maxavailability;
SHOW CONFIGURATION;
EOF
'''

create_and_run_script(contents, '/tmp/max_avail.sh', "/bin/bash /tmp/max_avail.sh", p_container)
Maximum Performance to Maximum Protection
As before we'll use the Database Guard Broker command line tool to make the change.
contents = f'''
dgmgrl sys/{sys_password}@{db_name} << EOF
SET ECHO ON;
SHOW CONFIGURATION;
edit database {stby_name} set property logxptmode=SYNC;
edit configuration set protection mode as maxprotection;
SHOW CONFIGURATION;
EOF
'''

create_and_run_script(contents, '/tmp/max_prot.sh', "/bin/bash /tmp/max_prot.sh", p_container)
Back to Max Perfromance
We'll use Database Guard Broker to change us back to asynchronus mode.
contents = f'''
dgmgrl sys/{sys_password}@{db_name} << EOF
SET ECHO ON;
SHOW CONFIGURATION;
edit configuration set protection mode as maxperformance;
edit database {stby_name} set property logxptmode=ASYNC;
SHOW CONFIGURATION;
EOF
'''

create_and_run_script(contents, '/tmp/max_prot.sh', "/bin/bash /tmp/max_prot.sh", p_container)
Oracle Database 19c Acvtive Data Guard DML Redirect
On Oracle Database 19c we can also enable DML redirect from the standby to the primary. I'll add this on the release of the Oracle Database 19c software for on premises.
Jupyter Notebooks, Python and Oracle Installation on Linux
Installing Jupyter-lab and Docker environment on Linux
The following walk-through guides you through the steps needed to set up your enviroment to run Jupyter-lab, Oracle and Docker to build and run docker images for testing. This should work for either an on premises install or on Oracle's cloud using IaaS (Compute). This walkthough will serve primarily as a reminder to myself.
Prerequisites
I'm making the assumption that you're running on Linux (I've a similar walkthrough for mac). In my example I'm using Oracle Enterprise Linux 7 (OEL). I'm also assuming a few other things
- Python 3.6 or higher is installed
- You have access to root either directly or via sudo. In this example I'm installing everything in the Oracle user account that has sudo privelege
- Docker is installed. If it isn't, see this excellent guide. If you aren't running as root also make sure you follow this final step as well.
Install
The install is pretty simple. It consists of setting up python, installing Oracle Instant client, installing Git and then cloning this directory to the server. Lets start with setting up the Python Environment
Python Setup
By default OEL 7 runs Python 2 rather than Python 3 which is likely to change in the future, until then we have a few steps we need to run through. The first is to install pip and virtualenv. We can easily do this on OEL with yum
sudo yum install python36-pip
If this command fails saying something like No package python36-pip available. then you'll need to edit the yum config file at /etc/yum.repos.d/public-yum-ol7.repo and enable the software development repos.
The next step is to install virtualenv. Virtualenv enables us to create isolated sandpits to develop Python applications without running into module or library conflicts. Once we have pip installed it's very simple to install
sudo pip3.6 install virtualenv
Next we can create a virtual environment and enable it.
virtualenv -p /usr/bin/python36 myvirtualenv
source myvirtualenv/bin/activate
This will create a directory called myvirtualenv (you can call it what you like) with it's own version of the python interpreter and pip. Once we "active it", any library we install will only be in this directory and won't effect the system as a whole. You should see you command prompt change when you activate it. It should look something like this
[04:59 PM : oracle@ora18server ~]$ virtualenv -p /usr/bin/python36 myvirtualenv
Running virtualenv with interpreter /usr/bin/python36
Using base prefix '/usr'
  No LICENSE.txt / LICENSE found in source
New python executable in /home/oracle/myvirtualenv/bin/python36
Also creating executable in /home/oracle/myvirtualenv/bin/python
Installing setuptools, pip, wheel...
done.
[05:00 PM : oracle@ora18server ~]$ source myvirtualenv/bin/activate
(myvirtualenv) [05:00 PM : oracle@ora18server ~]$ ls
Desktop       ora18server-certificate.crt  sql    swingbench
myvirtualenv  OracleUtils                  sqlcl  wallet
(myvirtualenv) [05:00 PM : oracle@ora18server ~]$
Running the following command will show what Python models we have installed at this point.
(myvirtualenv) [05:00 PM : oracle@ora18server ~]$ pip list
Package    Version
---------- -------
pip        19.0.3
setuptools 40.8.0
wheel      0.33.1
Which shouldn't be very many.
Git Installation
We now need to install Git which is useful for managing and versioning code. That might not be a requirement for you but it also makes it very simple to clone existing repostories. Installing it is very simple.
sudo yum install git
We can now clone my IPython/Jupyter notebooks from github which provides you with the code for creating your own Oracle Docker Images.
git clone https://github.com/domgiles/JuypterLabWork.git
This will create a directory call JuypterLabWork
Installing Oracle Instant Client
One of the recent updates to Oracles install models is the support for RPMs and yum installations without the need for click through agreements. This makes it very simple to install a client with a single command
sudo yum install oracle-instantclient18.3-basic
This will typically install the the software into /usr/lib/oracle/18.3
Installing Jupyter-Lab
In the JupyterLabWork directory that was created when we ran the git clone command there's a file called requirments.txt. This is a list of modules needed to run the notebooks in that directory. To install them all you need to do is to run the command
pip install -r requirements.txtThis will install all of the needed modules. From there all we need to do is to run the command
jupyter-labIf you're running directly on a workstation or virtual machine and have a browser installed it should take you directly into the jupyter environment.
If you're running headless then when jupyter-lab starts it should give you a url that you can connect to. Look for something like
[I 12:52:30.450 NotebookApp] The Jupyter Notebook is running at:
[I 12:52:30.450 NotebookApp] http://oracle18cserver:8888/?token=f71e677e202f5fffc3d20fe458ff973e616e0dc3b8eaf072
[I 12:52:30.450 NotebookApp] Use Control-C to stop this server and shut down all kernels (twice to skip confirmation).
That's it.
Connecting to Oracle ADB from Python
Connect to Oracle ATP or ADW from Python
I realised that in some of my previous posts I didn't really detail connecting to ATP and ADW. Here's a slight more in depth walkthough.
Connecting to Oracle Autonomous Transaction Processing or Autonomous Datawarehouse is pretty simple from Python. It requires only a few things
- Oracle Instant Client (Or alternative)
- A Python environment.
- The Oracle_CX Python driver Module.
- A valid wallet for an ATP or ADW service
Let's go through each of these in turn
Oracle Instant Clent
The next step is pretty straight forward. You can download the oracle instant client from here.
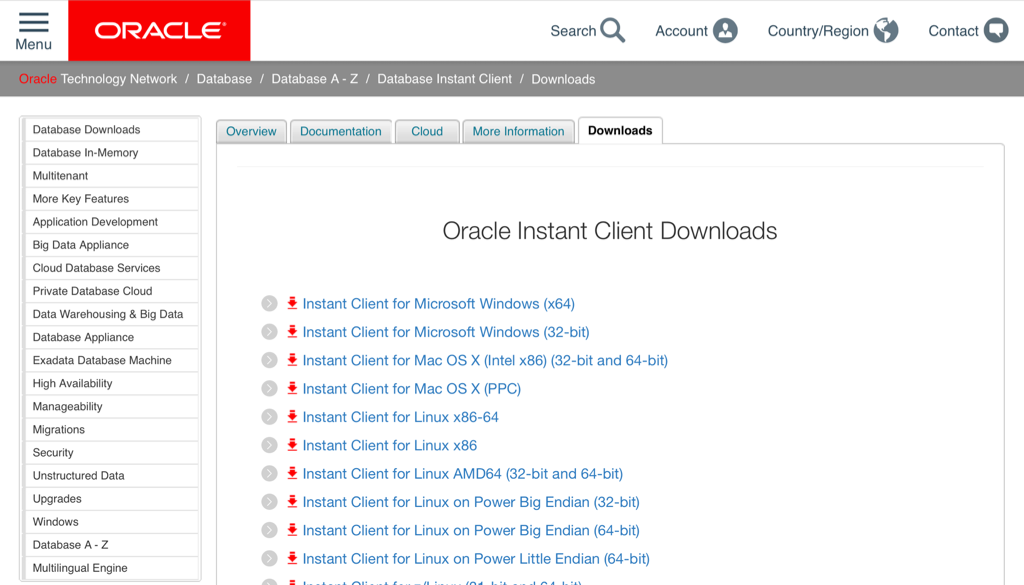
You'll only need the basic package. Unzip the downloaded file into a suitable location. It's worth pointing out that on Linux this step is even easier. You can now use yum to install the instant client direct from the command line. You can find details on how to configure it here
Python environment
There's plenty of guides out there that show you how to install python on your windows or mac. If you haven't done this already This guide is a good place to start. I'm assuming that you've also gone through the steps of installing pip. If not you can follow this simple guide. I'd also advice you create a virtual environment with virtualenv before you doing anything else. It's considered best practice and isolates you from current or future library conficts.
First lets create our virtual env
virtualenv adb_virt_envAnd then active it (I'm assuming linux or mac)
source adb_virt_env/bin/activateThe next step is to install the Python driver. This is as simple as
pip install cx_OracleAnd thats all we need to do at this stage inside to setup our Python environment.
Oracle ADW or ATP Wallet
The final thing we need is the wallet containing the credential and connect string details to enable us to connect to ATP or ADW. You'll need to log onto Oracle OCI console to do this unless have been provided the wallet by a colleague. Simply navigate to your ATP or ADW instance and follow the instructions below.
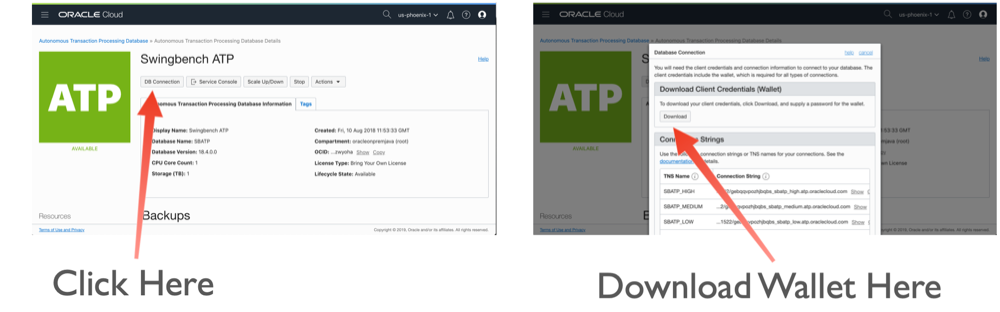
While it's not necessary we'll download and unzip the wallet into the virtual directory we've created (adb_virt_env).
$> ls
bin                cx_Oracle-doc      include            lib                pip-selfcheck.json wallet_SBATP.zip
$> unzip wallet_SBATP.zip
Archive:  wallet_SBATP.zip
  inflating: cwallet.sso
  inflating: tnsnames.ora
  inflating: truststore.jks
  inflating: ojdbc.properties
  inflating: sqlnet.ora
  inflating: ewallet.p12
  inflating: keystore.jks
$> ls
bin                cx_Oracle-doc      include            lib                pip-selfcheck.json tnsnames.ora       wallet_SBATP.zip
cwallet.sso        ewallet.p12        keystore.jks       ojdbc.properties   sqlnet.ora         truststore.jks
Next we need to edit the sqlnet.ora file to reflect the location where it's located. Currently for my environment it looks like
WALLET_LOCATION = (SOURCE = (METHOD = file) (METHOD_DATA = (DIRECTORY="?/network/admin")))
SSL_SERVER_DN_MATCH=yes
We'll need to change the DIRECTORY parameter to our virtual environment. In my case /Users/dgiles/Downloads/adb_virt_env. So for my environment it will look like
WALLET_LOCATION = (SOURCE = (METHOD = file) (METHOD_DATA = (DIRECTORY="/Users/dgiles/Downloads/adb_virt_env")))
SSL_SERVER_DN_MATCH=yes
We should also take a look at tnsnames.ora to see which services we'll be using. You can do this by taking a look in the tnsnames.ora file. There's likely to by lots of entries if you have lots of ATB or ADW instances in you OCI compartment. In my instance I'll be using a connect string called sbatp_medium which has a medium priority but pick the one appropriate to your environment.
sbatp_medium = (description= (address=(protocol=tcps)(port=1522)(host=adb.us-phoenix-1.oraclecloud.com))(connect_data=(service_name=gebqwccvhjbqbs_sbatp_medium.atp.oraclecloud.com))(security=(ssl_server_cert_dn=
        "CN=adwc.uscom-east-1.oraclecloud.com,OU=Oracle BMCS US,O=Oracle Corporation,L=Redwood City,ST=California,C=US"))   )
We'll only need to remember its name for the next step.
The Code
Finally we're ready to write some code. The first step is to import the modules we'll need. In this case it's just cx_oracle and os
import cx_Oracle
import os
We need to set the environment variable TNS_ADMIN to point at our directory (adb_virt_env) where all of the files from our wallet are located.
os.environ['TNS_ADMIN'] = '/Users/dgiles/Downloads/adb_virt_env'
And now we can simply connect to ATP or ADW instance using a standard Python database connect operation using the connect string we remebered from the tnsnames.ora file. NOTE : I'm assuming you've created a user in the database or you're using the admin user created for this instance.
connection = cx_Oracle.connect('admin', 'ReallyLongPassw0rd', 'sbatp_medium')
And thats it... From here on in we can use the connection as it was a local database.
cursor = connection.cursor()
rs = cursor.execute("select 'Hello for ADB' from dual")
rs.fetchall()
Oracle SODA Python Driver and Jupyter Lab
Oracle SODA Python Driver and Jupyter Lab
This workbook is divided into two sections the first is a quick guide to setting up Jupyter Lab (Python Notebooks) such that it can connect to a database running inside of OCI, in this case an ATP instance. The second section uses the JSON python driver to connect to the database to run a few tests. This notebook is largely a reminder to myself on how to set this up but hopefully it will be useful to others.
Setting up Python 3.6 and Jupyter Lab on our compute instance
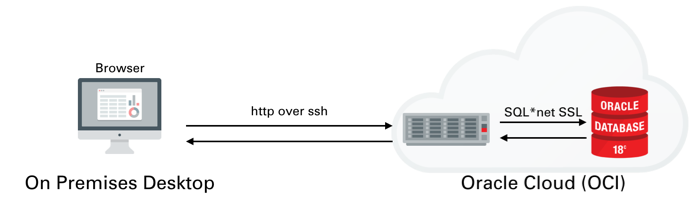
I won't go into much detail on setting up ATP or ADW or creating a IaaS server. I covered that process in quite a lot of detail here. We'll be setting up something similar to the following
Once you've created the server You'll need to logon to the server with the details found on the compute instances home screen. You just need to grab it's IP address to enable you to logon over ssh.
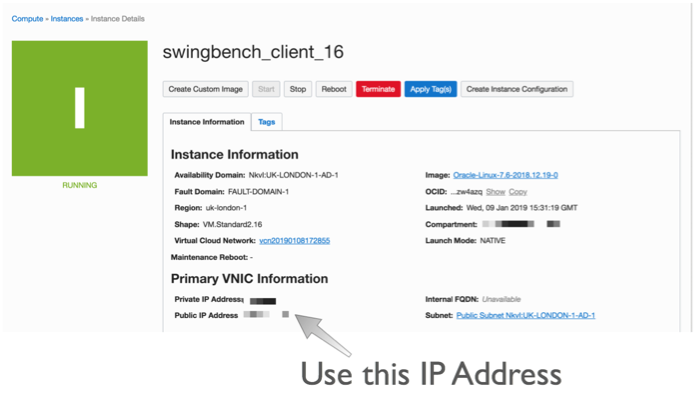
The next step is to connect over ssh to with a command similar to
ssh opc@132.146.27.111
Enter passphrase for key '/Users/dgiles/.ssh/id_rsa':
Last login: Wed Jan  9 20:48:46 2019 from host10.10.10.1
In the following steps we'll be using python so we need to set up python on the server and configure the needed modules. Our first step is to use yum to install python 3.6 (This is personal preference and you could stick with python 2.7). To do this we first need to enable yum and then install the environment. Run the following commands
sudo yum -y install yum-utils
sudo yum-config-manager --enable ol7_developer_epel
sudo yum install -y python36
python3.6 -m venv myvirtualenv
source myvirtualenv/bin/activate
This will install python and enable a virtual environment for use (our own Python sand pit). You can make sure that python is installed by simply typing python3.6 ie.
$> python3.6
Python 3.6.3 (default, Feb  1 2018, 22:26:31)
[GCC 4.8.5 20150623 (Red Hat 4.8.5-16)] on linux
Type "help", "copyright", "credits" or "license" for more information.
>>> quit()
Make sure you type quit() to leave the REPL environment.
We now need to install the needed modules. You can do this one by one or simply use the following file requirements.txt and run the following command
pip -p requirements.txt
This will install all of the need python modules for the next step which is to start up Jupyter Lab.
Jupyter Lab is an interactive web based application that enables you do interactively run code and document the process at the same time. This blog is written in it and the code below can be run once your environment is set up. Vists the website to see more details.
To start jupyer lab we run the following command.
nohup jupyter-lab --ip=127.0.0.1 &Be aware that this will only work if you have activated you virtual environment. In out instance we did this with with the command source myvirtualenv/bin/activate. At this point the jupyter-lab is running in the background and and is listening (by default) on port 8888. You could start a desktop up and use VNC to view the output. However I prefer to redirect the output to my own desktop over ssh. To do this you'll need to run the following ssh command from your desktop
ssh -N -f -L 5555:localhost:8888 opc@132.146.27.111
Replacing the IP address above with the one for your compute instance
This will redirect the output of 8888 to port 5555 on your destop. You can then connect to it by simply going to the following url http://localhost:5555. After doing this you should see a screen asking you input a token (you'll only need to do this once). You can find this token inside of the nohup.out file running on the compute instance. It should be near the top of the file and should look something like
[I 20:49:12.237 LabApp] http://127.0.0.1:8888/?token=216272ef06c7b7cb3fa8da4e2d7c727dab77c0942fac29c8
Just copy the text after "token=" and paste it in to the dialogue box. After completing that step you should see something like this
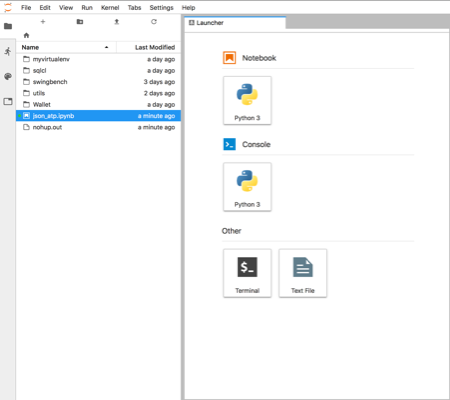
You can now start creating your own notebooks or load this one found here. I'd visit the website to familiarise yourself on how the notebooks work.
Using Python and the JSON SODA API
This section will walk through using The SODA API with Python from within the Jupyter-lab envionment we set up in the previous section. The SODA API is a simple object API that enables developers persist and retrieve JSON documents held inside of the Oracle Database. SODA drivers are available for Java, C, REST, Node and Python.
You can find the documentation for this API here
To get started we'll need to import the need the following python modules
import cx_Oracle
import keyring
import os
import pandas as pd
We now need to set the location of the directory containing the wallet to enable us to connect to the ATP instance. Once we've done that we can connect to the Oracle ATP instance and get a SODA object to enable us to work with JSON documents. NOTE : I'm using the module keyring to hide the password for my database. You should replace this call with the password for your user.
os.environ['TNS_ADMIN'] = '/home/opc/Wallet'
connection = cx_Oracle.connect('json', keyring.get_password('ATPLondon','json'), 'sbatp_tpurgent')
soda = connection.getSodaDatabase()
We now need to create JSON collection and if needed add any additional indexes which might accelerate data access.
try:
    collection = soda.createCollection("customers_json_soda")
    collection.createIndex({ "name"   : "customer_index",
                          "fields" : [ { "path"     : "name_last",
                          "datatype" : "string"}]})
except cx_Oracle.DatabaseError as ex:
    print("It looks like the index already exists : {}".format(ex))
We can now add data to the collection. Here I'm inserting the document into the database and retrieving it's key. You can find find some examples/test cases on how to use collections here
customer_doc = {"id"          : 1,
       "name_last"    : "Giles",
       "name_first"   : "Dom",
       "description"  : "Gold customer, since 1990",
       "account info" : None,
       "dataplan"     : True,
       "phones"       : [{"type" : "mobile", "number" : 9999965499},
                         {"type" : "home",   "number" : 3248723987}]}
doc = collection.insertOneAndGet(customer_doc)
connection.commit()
To fetch documents we could use SQL or Query By Example (QBE) as shown below. You can find further details on QBE here. In this example there should just be a single document. NOTE: I'm simply using pandas DataFrame to render the retrieved data but it does highlight how simple it is to use the framework for additional analysis at a later stage.
documents = collection.find().filter({'name_first': {'$eq': 'Dom'}}).getDocuments()
results = [document.getContent() for document in documents]
pd.DataFrame(results)
To update records we can use the replaceOne method.
document = collection.find().filter({'name_first': {'$eq': 'Dom'}}).getOne()
updated = collection.find().key(doc.key).replaceOne({"id"          : 1,
       "name_last"    : "Giles",
       "name_first"   : "Dominic",
       "description"  : "Gold customer, since 1990",
       "account info" : None,
       "dataplan"     : True,
       "phones"       : [{"type" : "mobile", "number" : 9999965499},
                         {"type" : "home",   "number" : 3248723987}]},)
connection.commit()
And just to make sure the change happened
data = collection.find().key(document.key).getOne().getContent()
pd.DataFrame([data])
And finally we can drop the collection.
try:
    collection.drop()
except cx_Oracle.DatabaseError as ex:
    print("We're were unable to drop the collection")
connection.close()
Making the alert log just a little more readable
But what if you are only looking after one or two or just testing something out? Well the most common solution is to simply tail the alert log file.
The only issue is that it's not the most exciting thing to view, this of course could be said for any terminal based text file. But there are things you can do to make it easier to parse visually and improve your chances of catching an unexpected issue.
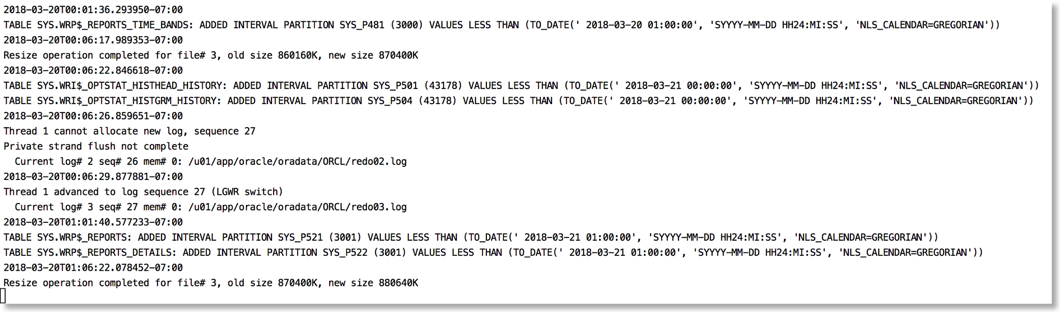
The approach I take is to push the alert log file through python and use the various libraries to brighten it up. It's very easy to go from this (tail -f)
To this
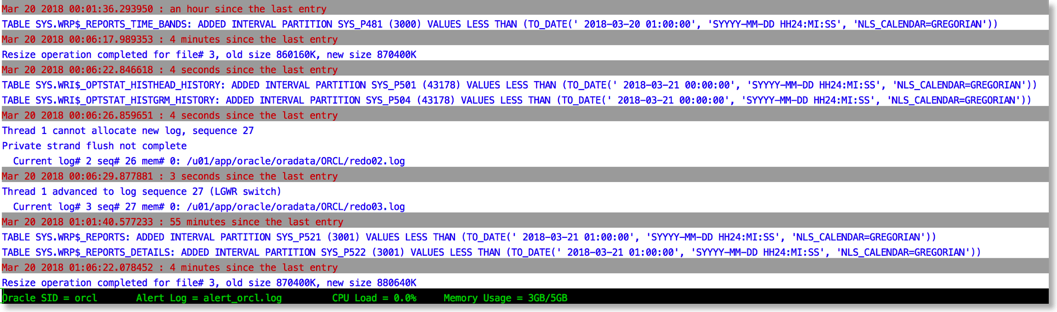
The reason this works is that python provides a rich set of libraries which can add a little bit of colour and formatting to the alert file.
You can find the code to achieve this in the gist below
Just a quick note on installing this. You'll need either python 2.7 or 3 available on your server.
I'd also recommend installing pip and then the following libraries
pip install humanize psutil colorama python-dateutil
After you've done that it's just a case of running the script. If you have $ORACLE_BASE and $ORACLE_SID set the library will try and make a guess at the location of the alert file. i.e
python alertlogparser.py
But if that doesn't work or you get an error you can also explicitly specify the location of the alert log with something like
python alertlogparser.py -a $ORACLE_BASE/diag/rdbms/orcl/orcl/trace/alert_orcl.log
This script isn't supposed to be an end product just a simple example of what can be achieved to make things a little easier. And whilst I print information like CPU load and Memory there's nothing to stop you from modifying the script to display the number of warnings or errors found in the alert log and update it things change. Or if you really want to go wild implement something similar but a lot more sophisticated using python and curses
The age of "Terminal" is far from over….